quickest-way-to-add-icons-to-your-tracks
quickest-way-to-color-tracks-items-in-reaper
the-theme-adjuster-for-reaper-7-a-comprehensive-guide
how-to-share-a-reaper-project-with-someone
how-to-convert-drums-to-midi-in-reaper
instantly-convert-audio-to-midi-in-reaper
how-to-export-import-reaper-settings
best-utility-scripts-in-reaper
the-proper-way-to-save-projects-in-reaper-7
how-to-insert-midi-notes-in-one-click-in-reaper
best-midi-settings-for-reaper-s-midi-editor
best-settings-for-reaper-7
practice-your-timing-with-midi-rhythm-trainer-for-reaper
why-reaper-is-not-saving-your-project-settings
how-to-stop-reaper-from-looping-items
split-midi-items-using-mouse-wheel-in-reaper
mind-blowing-midi-note-generator-in-reaper-midi-ex-machina
drum-racks-in-reaper
advanced-fx-browsing-in-reaper
reaper-7
global-scale-tool-in-reaper-let-it-key
5-useful-scale-tools-in-reaper
4-ways-to-get-minimal-in-reaper
how-to-recreate-a-guitar-noise-gate-plugin-in-reaper
best-free-plugins-for-reaper-tukan-studios
how-to-separate-tracks-in-the-mixer
how-to-tweak-any-reaper-theme
js-lava-reverb-amazing-free-shimmer-reverb
how-i-record-guitars-quick-and-easy-in-reaper
5-tips-for-getting-started-in-reaper
create-save-and-load-layouts-in-reaper
customize-the-look-of-your-midi-notes-in-reaper
copy-and-replace-midi-note-sections-in-reaper
quick-way-to-go-through-takes-in-reaper
pan-tracks-using-track-name
amazing-free-denoiser-in-reaper
easy-seamless-loop-using-second-pass-render-in-reaper
reverse-midi-trick-in-reaper
a-guide-to-automation-items-in-reaper
a-trick-to-expand-and-collapse-toolbars-in-reaper
10-automation-shortcuts-in-reaper
how-to-auto-color-in-reaper
quick-way-to-check-your-levels
select-item-without-cursor-moving
how-to-stack-regions-in-reaper
5-ways-to-display-audio-in-reaper
identify-scales
js-nostalgizer
reaper-fix-files
how-to-export-backup-reaper
how-to-merge-midi-in-reaper
layer-sounds-in-one-track-in-reaper
easy-way-to-navigate-big-projects
how-to-install-multiple-reapers
how-to-strum-midi-notes
10-tips-for-writing-midi-drums-in-reaper
how-to-add-borders-to-toolbar-icons-in-reaper-6
easiest-way-to-update-reaper
show-fx-list-inside-tracks-in-reaper
smoother-waveforms-and-meters-in-reaper
how-to-copy-and-paste-velocities-in-reaper-b
quickly-test-different-tempos-in-reaper
allow-drag-import-to-insert-new-tracks
duplicate-tracks-with-no-items
js-droplets
how-to-add-gradients-in-reaper
reaper-v6-72-tons-of-new-track-group-features
how-to-clean-your-fx-list-in-reaper-8
retrospective-midi-recording
6-ways-to-lower-cpu-load-in-reaper
6-metronome-tips-in-reaper
a-trick-to-quickly-loop-items-in-reaper
how-to-reorder-midi-notes-in-reaper
how-to-fully-collapse-folders
easy-audio-stutter-in-reaper
easy-clean-up-project-folders
open-project-folder-in-one-click
change-grid-size-with-your-mouse-wheel
reaper-v6-71
quickest-way-to-pan-tracks
how-to-set-midi-velocity-shortcuts
create-shortcuts-to-your-plugins
5-advanced-ways-to-edit-in-reaper
how-to-show-plugin-ui-inside-your-tracks
how-to-show-vu-meters-on-tracks
6-things-i-wish-i-knew-when-i-started-using-reaper
how-to-stretch-midi-notes
how-to-duplicate-tracks-without-items
a-tool-for-customizing-reaper-6-theme
using-the-master-playback-rate-to-set-tempo
js-ravager-the-extreme-upward-compressor
quick-trick-to-a-b-your-tracks-and-effects
quickest-way-to-detect-midi-chords
quickest-way-to-sidechain-in-reaper
capture-anything-in-reaper-with-global-sampler
how-to-rename-midi-notes
quickest-way-to-create-midi-items
5-ways-to-adjust-crossfades-in-reaper
get-useful-buttons-on-top-of-your-items
how-to-get-rid-of-recording-prompt

How to add borders to toolbar icons in REAPER 6

January 12, 2023

One thing that bothered me about the default REAPER 6 theme was the lack of borders on the toolbar icons. I much prefer them to look like buttons instead of just floating icons.

Luckily it’s a simple thing to tweak! And you can add this to any REAPER 6 theme out there 🤩
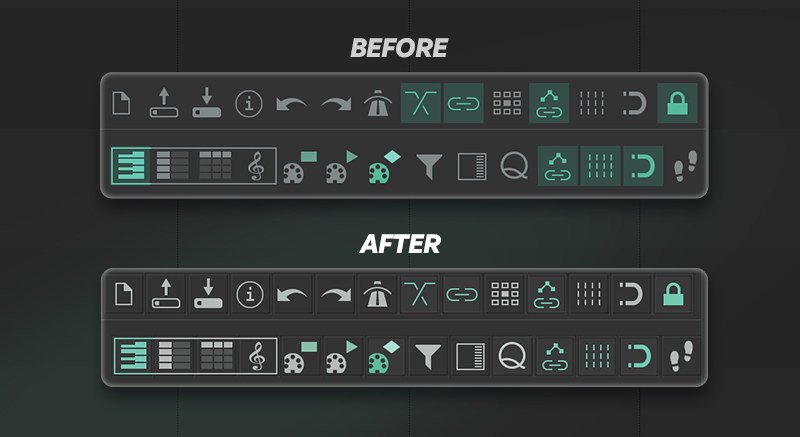
First, we need to understand what the “toolbar_blank.png” is. Then I can show you how to customize these to have whatever look you want!

About toolbar_blank.png

To change the look of the base of every toolbar icon, we need to modify an image inside every theme called "toolbar_blank.png".

It looks like this:

Just like all toolbar icons in REAPER, it's divided into three equal-length squares for the different button states: left for OFF, center for Hover, and right for ON.

They come in three different files for the different resolutions, each with the following sizes and divided into three equal squares.

  • 100% = 90x30px
  • 150% = 135x45px
  • 200% = 180x60px

With this knowledge, we are ready to tweak or even create our own toolbar blanks– It’s really fun! It’s one of those things that can completely change the vibe of your DAW.

Let’s now create a very simple border to understand how this works!

❤️
If you wish to skip all these steps, I made a bunch of borders and icons you can just download and import for free12 Icon Themes for REAPER 6

Creating borders for REAPER 6 icons

We need to create a “toolbar_blank.png” file with borders in all three squares.

In your favorite photo editor, create a 90x30 canvas and place three 30px squares side by side with a 1px inner stroke.

Additionally you can add different background colors for the different states.

I personally like my "OFF" state to be the same color as REAPER's background, the "Hover" state to be bright, and my "ON" state to be really dark, as if it had been pressed.

Then you need to do the same for the 150% and 200% version using the sizes from the section above.

Once they are ready, export the three toolbars in PNG format. Name them “toolbar_blank” and separate them in different folders like this:

❤️
I made a bunch of borders and icons you can just download and import for free12 Icon Themes for REAPER 6

Importing toolbar_blank

Once your toolbar blanks are ready, we need to unpack the theme, import these toolbar_blank.png files, and repack the theme. I will walk you through how to do that now. No worries it’s pretty simple ✨

Unzipping the theme

  1. In REAPER, go to Options > Show REAPER Resource Path.
  2. Go to “ColorThemes” folder and find the theme you wanna tweak.
    In this case we will tweak the default theme:
    Smooth 6.ReaperThemeZip.
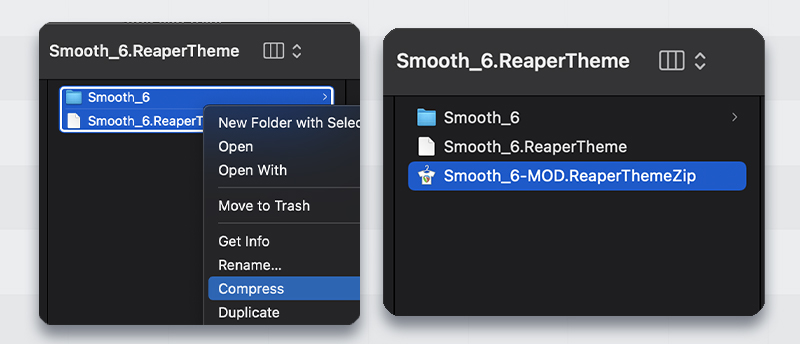
  3. To unpack this theme, rename the file’s extension and place a dot before the zip like this: “.ReaperTheme.Zip” and unzip it.
  4. Uncompress it, and you should end up with two files that look like this:

Importing the toolbar_blank files

Now that the theme is unpacked, we are ready to import the toolbar_blank.png files!

To do so, copy the contents of your favorite borders folder and paste it into the unpacked folder from the theme.
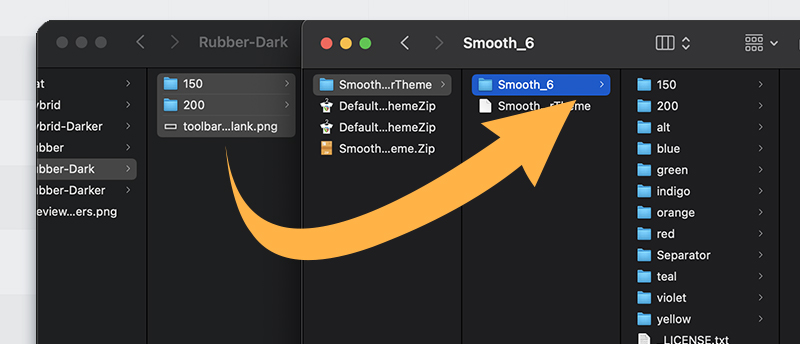
Make sure to match the destination folders. What’s inside the folder called “200” goes into the “200” folder in the unpacked theme and so on.

Repacking the theme

Lastly, we will zip back the two files we just unzipped. And name it with the extension “.ReaperThemeZip

This is now your new modified theme! 🤩

Load this theme and all your custom toolbar icons should have borders now 💙

Customizing your toolbar icons

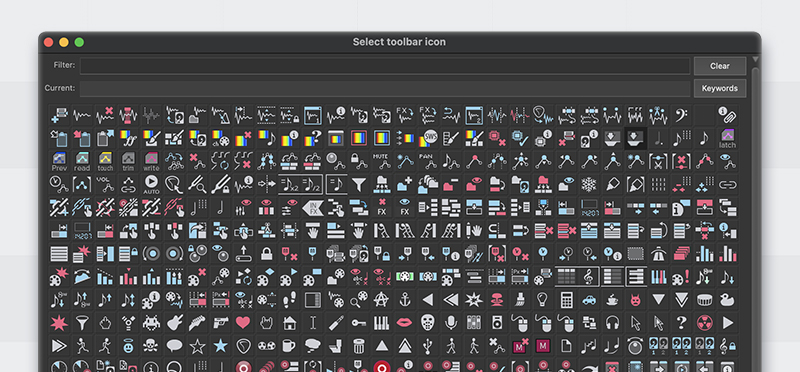
To change the icons in your toolbars, right click on an empty field of the toolbar and click on “Customize toolbar”.
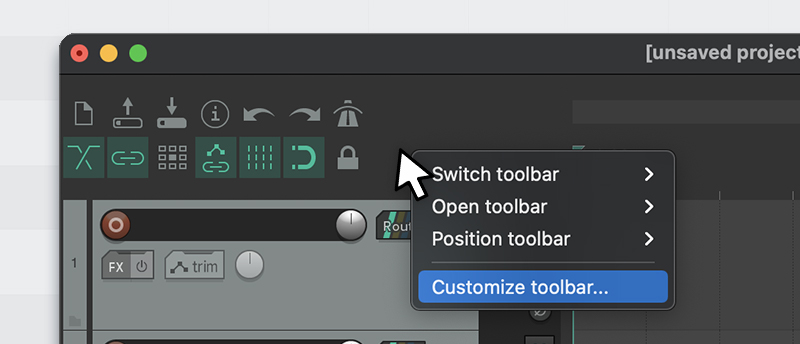
In here you can choose the action and click on “Icon… > Change Icon” at the bottom left of the window.
Change the look of all REAPER 6 icons

If you want to further customize your toolbar icons, I uploaded all REAPER 6 icons in a bunch of different colors and border styles.

Check it out → 12 Icon Themes for REAPER 6

Hai there!

I'm Alejandro, and I created this ad-free page to give you the best experience learning REAPER.

If you find my work helpful, please consider buying me a coffee. That'd help me cover the costs of this site and gives me more time to create free resources.

Buy me a coffee ♥
Buy me a coffee
View comments