quickest-way-to-add-icons-to-your-tracks
quickest-way-to-color-tracks-items-in-reaper
the-theme-adjuster-for-reaper-7-a-comprehensive-guide
how-to-share-a-reaper-project-with-someone
how-to-convert-drums-to-midi-in-reaper
instantly-convert-audio-to-midi-in-reaper
how-to-export-import-reaper-settings
best-utility-scripts-in-reaper
the-proper-way-to-save-projects-in-reaper-7
how-to-insert-midi-notes-in-one-click-in-reaper
best-midi-settings-for-reaper-s-midi-editor
best-settings-for-reaper-7
practice-your-timing-with-midi-rhythm-trainer-for-reaper
why-reaper-is-not-saving-your-project-settings
how-to-stop-reaper-from-looping-items
split-midi-items-using-mouse-wheel-in-reaper
mind-blowing-midi-note-generator-in-reaper-midi-ex-machina
drum-racks-in-reaper
advanced-fx-browsing-in-reaper
reaper-7
global-scale-tool-in-reaper-let-it-key
5-useful-scale-tools-in-reaper
4-ways-to-get-minimal-in-reaper
how-to-recreate-a-guitar-noise-gate-plugin-in-reaper
best-free-plugins-for-reaper-tukan-studios
how-to-separate-tracks-in-the-mixer
how-to-tweak-any-reaper-theme
js-lava-reverb-amazing-free-shimmer-reverb
how-i-record-guitars-quick-and-easy-in-reaper
5-tips-for-getting-started-in-reaper
create-save-and-load-layouts-in-reaper
customize-the-look-of-your-midi-notes-in-reaper
copy-and-replace-midi-note-sections-in-reaper
quick-way-to-go-through-takes-in-reaper
pan-tracks-using-track-name
amazing-free-denoiser-in-reaper
easy-seamless-loop-using-second-pass-render-in-reaper
reverse-midi-trick-in-reaper
a-guide-to-automation-items-in-reaper
a-trick-to-expand-and-collapse-toolbars-in-reaper
10-automation-shortcuts-in-reaper
how-to-auto-color-in-reaper
quick-way-to-check-your-levels
select-item-without-cursor-moving
how-to-stack-regions-in-reaper
5-ways-to-display-audio-in-reaper
identify-scales
js-nostalgizer
reaper-fix-files
how-to-export-backup-reaper
how-to-merge-midi-in-reaper
layer-sounds-in-one-track-in-reaper
easy-way-to-navigate-big-projects
how-to-install-multiple-reapers
how-to-strum-midi-notes
10-tips-for-writing-midi-drums-in-reaper
how-to-add-borders-to-toolbar-icons-in-reaper-6
easiest-way-to-update-reaper
show-fx-list-inside-tracks-in-reaper
smoother-waveforms-and-meters-in-reaper
how-to-copy-and-paste-velocities-in-reaper-b
quickly-test-different-tempos-in-reaper
allow-drag-import-to-insert-new-tracks
duplicate-tracks-with-no-items
js-droplets
how-to-add-gradients-in-reaper
reaper-v6-72-tons-of-new-track-group-features
how-to-clean-your-fx-list-in-reaper-8
retrospective-midi-recording
6-ways-to-lower-cpu-load-in-reaper
6-metronome-tips-in-reaper
a-trick-to-quickly-loop-items-in-reaper
how-to-reorder-midi-notes-in-reaper
how-to-fully-collapse-folders
easy-audio-stutter-in-reaper
easy-clean-up-project-folders
open-project-folder-in-one-click
change-grid-size-with-your-mouse-wheel
reaper-v6-71
quickest-way-to-pan-tracks
how-to-set-midi-velocity-shortcuts
create-shortcuts-to-your-plugins
5-advanced-ways-to-edit-in-reaper
how-to-show-plugin-ui-inside-your-tracks
how-to-show-vu-meters-on-tracks
6-things-i-wish-i-knew-when-i-started-using-reaper
how-to-stretch-midi-notes
how-to-duplicate-tracks-without-items
a-tool-for-customizing-reaper-6-theme
using-the-master-playback-rate-to-set-tempo
js-ravager-the-extreme-upward-compressor
quick-trick-to-a-b-your-tracks-and-effects
quickest-way-to-detect-midi-chords
quickest-way-to-sidechain-in-reaper
capture-anything-in-reaper-with-global-sampler
how-to-rename-midi-notes
quickest-way-to-create-midi-items
5-ways-to-adjust-crossfades-in-reaper
get-useful-buttons-on-top-of-your-items
how-to-get-rid-of-recording-prompt

4 ways to get minimal in REAPER

With the many years of using REAPER, I have started to appreciate the fact that instead of cluttering every space with actions and buttons, I can also do the complete opposite and get a minimal, focused view.

Lately, I have been getting easily overwhelmed and want fewer things on my screen so I can focus. If you are like me, I have a few tips that might help with that.


In this article:

  1. Completely collapse folders.
  2. Hide and expand toolbars.
  3. Show only selected tracks.
  4. Using custom layouts.

1. Completely collapsing folders

When you super-collapse the folders, you get a bunch of tiny lines representing each track inside the folder. While this is useful to know the number of tracks inside, I think it simply makes the project look more cluttered than it should.
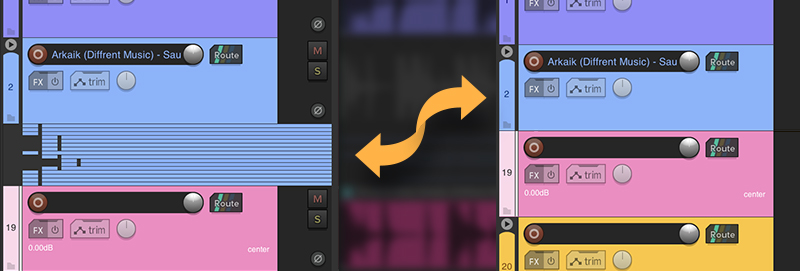
There is a little hack we can do to any theme to get rid of these tiny tracks so you get nothing.

Check out the full tutorial here → https://reapertips.com/post/how-to-fully-collapse-folders

2. Hiding and expanding toolbars

I have been using this little trick to show and hide toolbars that are docked on my screen using buttons. It is a nice way to expand and collapse sets of icons as you need them.

Here is a video walkthrough on how I achieve this:

3. Showing only selected tracks

Imagine selecting only the tracks you need for the moment, let's say drums/bass/guitars, clicking a toggle, and it will only show those tracks in the TCP. Then when you are done to restore the view, you can hit the same button again.

This is possible using a cycle action! And it is one of my favorite things. It helps me a lot to focus on the tracks that matter, especially if I am making a song.

You need the SWS extension for this to work.

Additionally, you need ReaPack installed and import the following repository.

Download and import this cycle action → LINK

🎥 Here is a video walkthrough on how to do this:

4. Using custom layouts

Another way to get a minimal, focused view is to create custom layouts that only show the elements you need for a specific task. You can save these layouts and easily switch between them as needed.

To create a custom layout, go to the "View" menu and select "Screensets". From there, you can save and recall how you currently have everything setup. This includes all toolbars, windows position, dock positions, etc.

That’s it!

I hope these tips help you achieving a minimal look on REAPER and improve focus! Let me know if you have any extra tips like this.

Hai there!

I'm Alejandro, and I created this ad-free page to give you the best experience learning REAPER.

If you find my work helpful, please consider buying me a coffee. That'd help me cover the costs of this site and gives me more time to create free resources.

Buy me a coffee ♥
Buy me a coffee
View comments