The theme adjuster for REAPER 7 is finally here, allowing you to fully customize your interface experience. With lots of cool options, including some that I think are essential to change, this tool is a game-changer! 🚀
In this article, I am going to walk you through the adjuster and show you some settings I recommend changing 👍
↳ NEW Theme Adjuster in REAPER 7 | Finally HERE!
✏️ Compatibility
- This version of the adjuster works only with the REAPER 7 theme and REAPER 7 theme mods like the Anti Theme.
- For the REAPER 6 theme and REAPER 6 theme mods like Reapertips Theme, it works with the first version of the adjuster.
- For other non-default-based themes, none of the adjusters will work unless the creator made their own theme adjuster like Flat Madness did.
🔍 How to find the theme adjuster
First, make sure you have the latest version of REAPER v7.0+ and you are using the REAPER 7 theme or any REAPER 7 theme mod.
► To find the theme adjuster navigate to Options > Theme > Theme Adjuster.

Quick overview
Once you open the adjuster, a window with a bunch of configurable settings will appear. It features a sidebar with different sections and a resizable main area.

One thing I love is that most of the settings are intuitive, and changes reflect in both the adjuster and REAPER in real-time.
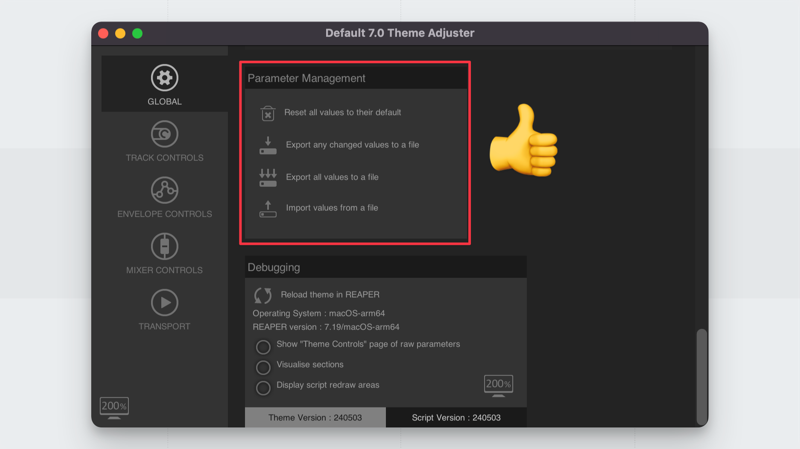
Don’t be afraid!
I super encourage you to just play around with all of the settings to see what they do.
Don't worry about breaking anything, as you can reset everything to default settings or export/import settings.
Next, I am going to go through some of the different sections and give you some suggestions that are worth checking! 💪
Global Adjustments
Starting from the top, one of my favorite features is the ability to change the strength of the track color.
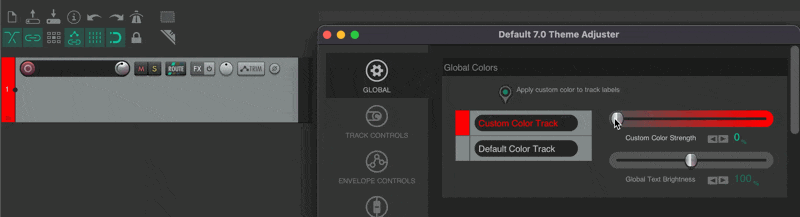
Previously, the track color was too strong, making it difficult to see the controls. Now, you can adjust the strength of the color, getting the best of both worlds!
You can also control whether the track gets a darker or brighter shade by changing the background color in track controls, with options to set your own color.
All these settings apply to both the track panel and the mixer. If you prefer not to have colored labels, you can uncheck “apply custom color to track labels”. You can also adjust the global text brightness, affecting tracks labels, transport, meter, etc.
📮 Track Selection
You can customize how it looks when you select a track:
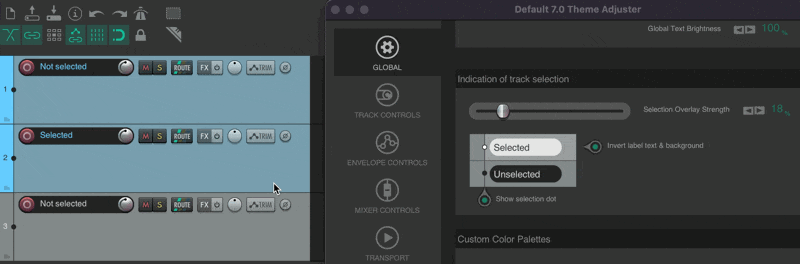
There’s an option for the track name to invert, but I prefer to keep this disabled as it can be difficult to read when inverted. I am a huge fan of the selection dot, which is an elegant, non-intrusive way to show track selection.
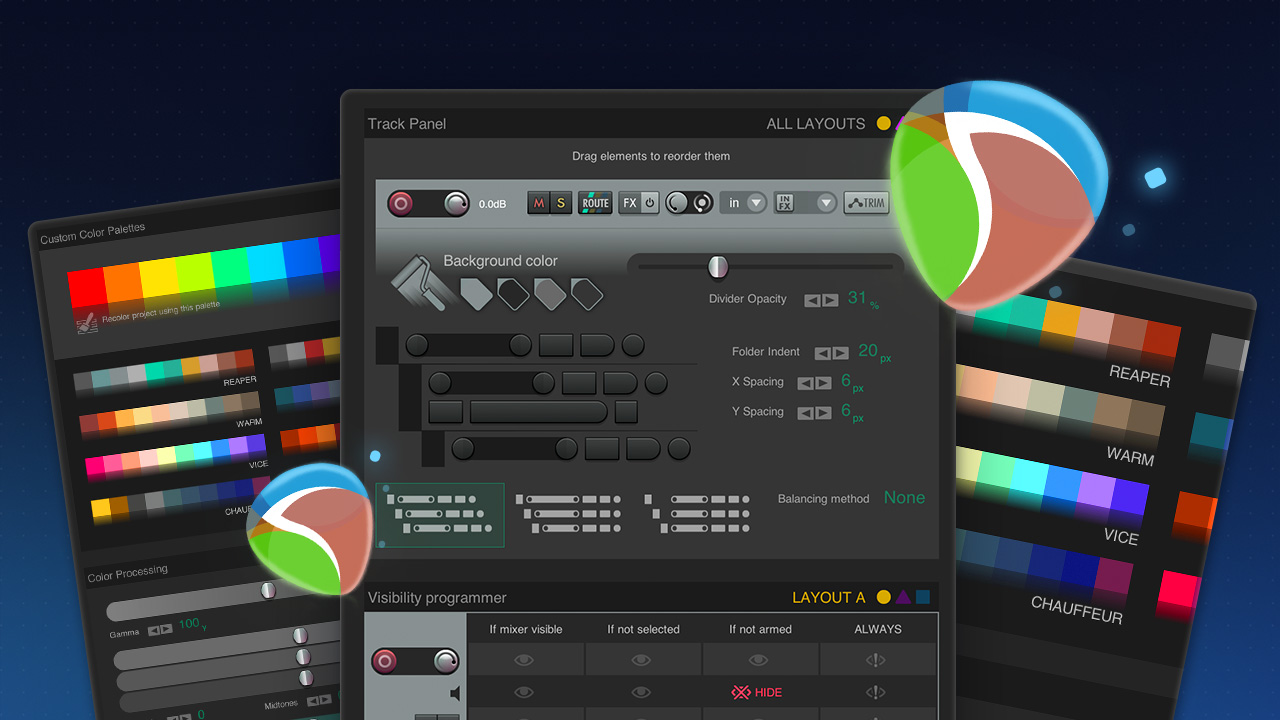
🎨 Custom Color Palettes
In this section, you can choose from different color palettes and color your tracks or items by pressing any of the color boxes.

A super cool feature is the “recolor project using this palette” button, which recolors your project tracks intelligently. That means that if you had tracks of the same color, they will remain the same color but in another shade.
Personally, I think this feature has a lot of potential, but for real-world use, it's just not practical. I would love to see this as a dedicated, compact window or a dockable section for easier access. Or at least, have these as actions we can set shortcuts to!
On that note, I highly recommend the script called Color Palette by Rodilab, which has been my go-to for years. You can easily create your own palettes, and the available shortcuts make it a super fast way to color your items and tracks!
🎚️ Color Processing
This section allows you to adjust the gamma, brightness, and contrast of the entire REAPER interface.

This thing is just… SUPER helpful!
Every monitor looks different, and depending on the environment, things may not look optimized for you.
For example, my old monitor had very strong contrast, making things look too dark. By increasing the gamma, I was able to fix this. I also prefer brighter mids and highlights so the environment is not as dark. You can adjust these with the sliders to your taste and greatly improve your setup!
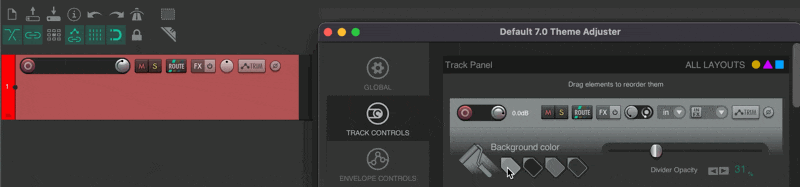
Track Panel
The track controls section offers a lot of customization. Here are some of the cool things you can do:
🔄 Reorder Track Controls
You can drag any of the TCP elements to reorder them as you like. For example, you can easily place the pan button next to the volume knob.
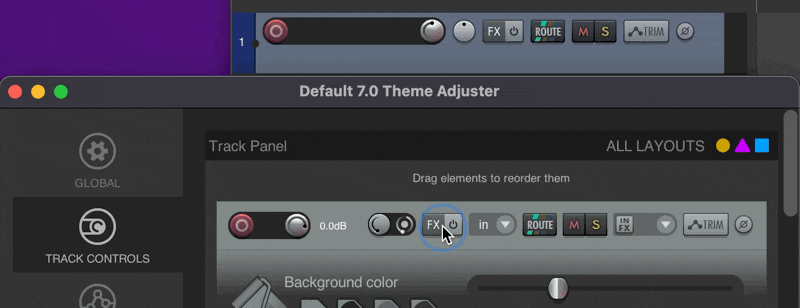
Additionally, you are able to adjust the opacity of the divider line, the folder indent spacing, and the X and Y button spacing to suit your preference.
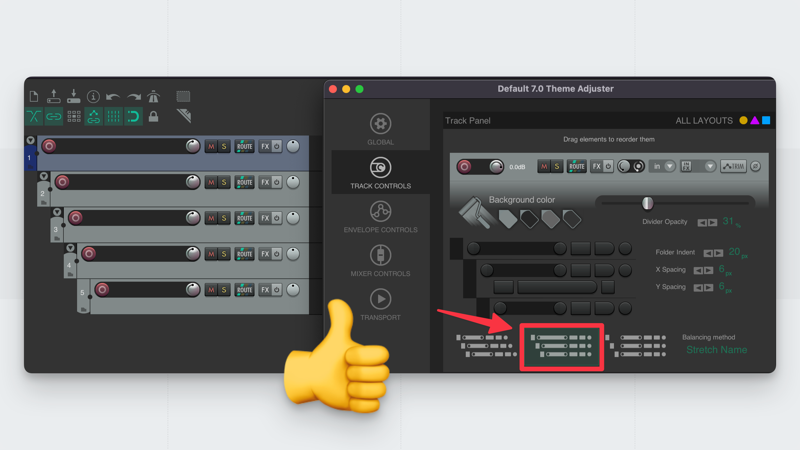
↔️ Balancing Methods
By default, REAPER’s track buttons do not align when nested into folders. I am not a fan of how this looks 🫠
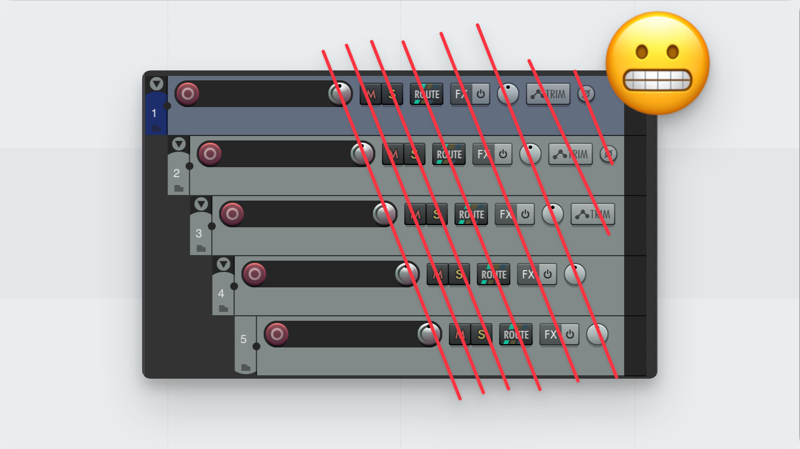
I highly recommend choosing one of the two aligning methods “stretch name” or “balance all”. I prefer the “stretch name” method for a cleaner look!
👁️ Visibility Programmer
The visibility programmer lets you show and hide track buttons based on conditions like mixer visibility, selection, and arming status.

By default, REAPER hides the pan button when the mixer is visible. You can untick this box if you prefer the pan button to always be visible, even when the mixer is open.
Evaluate which buttons you want always available and which ones can be hidden based on your workflow.
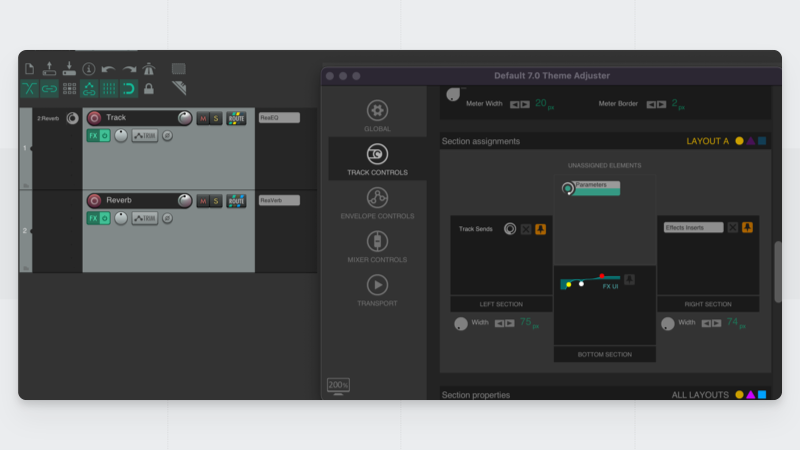
🧩 Sections Assignment
Now, the section assignments—this one took a bit to understand but it’s amazing what you can do now! 🤩
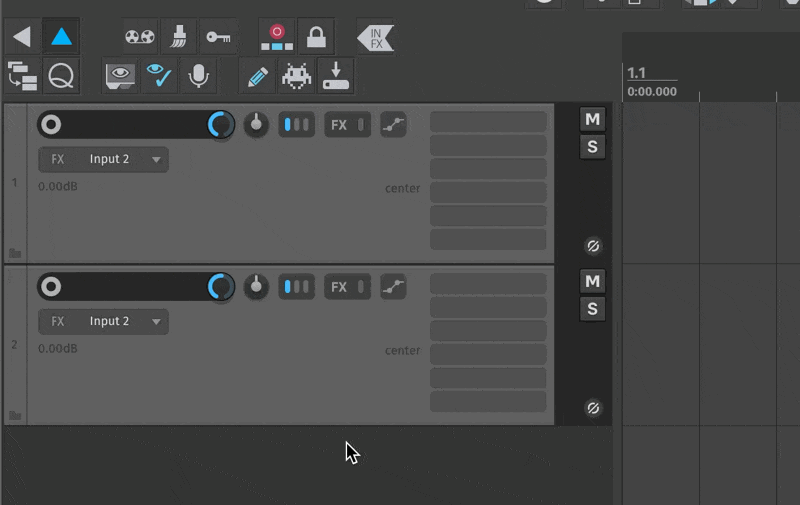
In case you didn’t know, in REAPER you can show FX inserts in the track by right-clicking in an empty area of the track panel and selecting "Show FX inserts in TCP." You will also see "Show sends in TCP." Let’s enable that too.

Many REAPER plugins have an option to embed their interface into either the track or mixer panel. So, let’s load ReaEQ, right-click on it, and select "Show embedded UI in TCP." Let’s also create a send by clicking and dragging the route button to another track.
Now back to the adjuster—you can control a lot of these things.
For example, maybe you want the FX inserts on the left side. Just click and drag it to the left section. If you want the FX inserts to always show, even if they’re empty, you can check the pin icon. I prefer this since it allows you to quickly add FX.
Another interesting thing is that you can have the FX inserts and the track sends side by side if you set it up that way. Or on opposite sides. You can also adjust the width of the side sections.
So, if you mix without using the mixer like me, these features are super helpful!
There are a few more things you can adjust for these sections, like the minimum and maximum width. Setting a small maximum width allows you to have multiple columns.
I also like to keep the empty section opacity at 100%—this way it’s more consistent.
✏️ About Layout A, B and C
You can have up to three different layouts and easily switch between them in your tracks.

At the top right, you'll see “Layout A” is selected, which is the default layout in REAPER. You can press the triangle or square to switch to layout B or C.
There are multiple ways to change layouts. The simplest way is by right-clicking a track and selecting Track Layout, where you'll find layout A, B, and C.
You can also map any layout to shortcuts by going to View > Screensets, where you can set any layout as an action with 20 available slots. Then, use the Action “Layout: Apply custom layout” with the matching numbers.
If you have the SWS extension, you can use the Auto Layout feature to automatically change the layout based on the name.
Envelope Controls
The next section is envelope controls, which are similar to what we've seen so far. You can change the background color, label and fader length, and divider opacity.
My favorite feature is that you can now apply a custom color to the envelope track using this slider!

Mixer Controls
Next, we have mixer controls, which are a bit similar to the track controls.
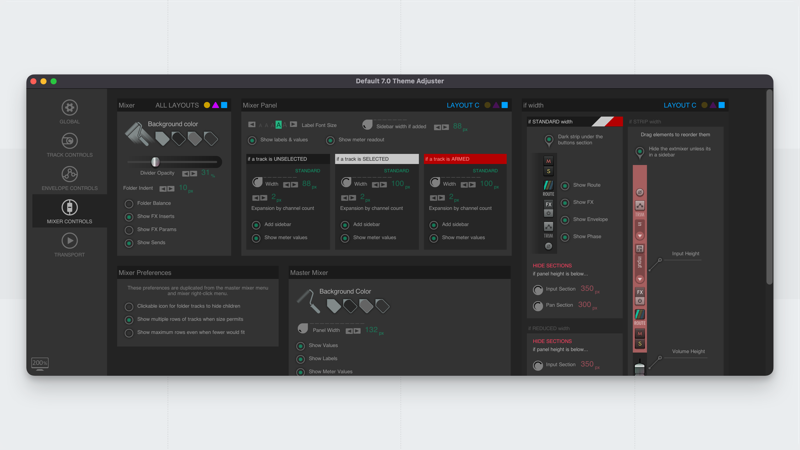
From the top, you can change the background color, adjust the divider opacity, and set the folder indentation.
There are options like folder balance, which aligns the meter to the top folder, and shows FX inserts, parameters, and sends.
🚀 Mixer Panel
The mixer panel is where it gets interesting. I genuinely think this is the most responsive and impressive feature so far in REAPER 7.

You can set up three states: when the track is unselected, selected, or armed.
For example, if a track is unselected, you can change the width. There are three layouts depending on the width you set:
- Standard size: You can show and hide four icons.
- Reduced layout: All buttons are nicely condensed.
- Strip layout: This layout appears when set to a low width.
In the adjuster, you can scroll down to customize the strip layout. You can change the order of the buttons or adjust the size of the fader, meter, label, and input. You can also choose to hide the inserts area unless it's a sidebar.
The same logic applies to the other three states. For example, if you want a sidebar to appear when the track is selected, enable "add sidebar" and maybe "show meter values." The cool thing is you can add the sidebar even if you have a strip layout.
The expansion by channel count determines how much the track will expand with multiple outputs. For example, with Superior Drummer, you'd get a super wide channel. I like to set this to none so it doesn't stretch.
Lastly, there are some preferences like clickable icons for folders to hide children, showing multiple rows when size permits, and showing maximum rows even when fewer would fit.
Then, some customization options for the master mixer include background, width, show value, label, and meter values.
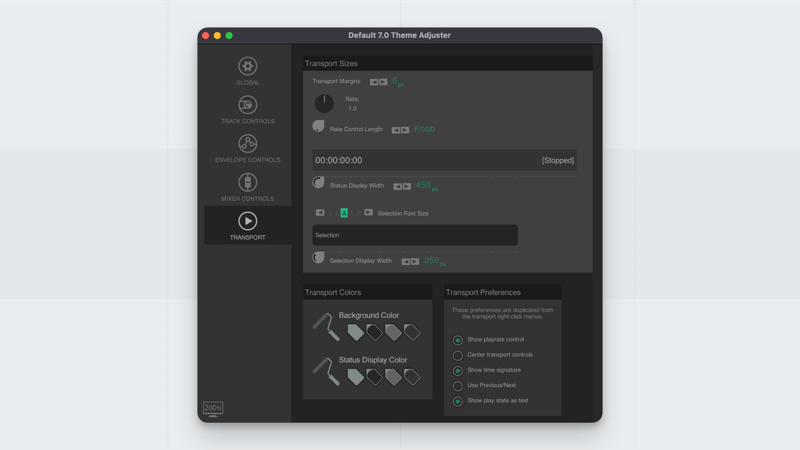
Transport Section
The transport section offers tweaks like margin adjustments, rate knob length, status display width, and selection font size. You can also change the background color and status display color, along with various preferences like showing playrate control and centering transport controls.
💙 That’s it!
The new adjuster certainly has a lot of options. I honestly have mixed feelings about it overall.
I made a video discussing this extreme flexibility and its consequences. 📹 Watch here → The Insane Evolution of REAPER’s Interface. It’s a fun video, and I would love to hear your thoughts on it!
I hope this guide helps you get the most out of the REAPER 7 theme adjuster. Happy customizing!
P.S: I am currently working on a new version of the Reapertips Theme which should work with this theme adjuster. It’s a lot of work so I appreciate your patience <3
ㅤ