how-to-share-a-reaper-project-with-someone
how-to-convert-drums-to-midi-in-reaper
instantly-convert-audio-to-midi-in-reaper
how-to-export-import-reaper-settings
best-utility-scripts-in-reaper
the-proper-way-to-save-projects-in-reaper-7
how-to-insert-midi-notes-in-one-click-in-reaper
best-midi-settings-for-reaper-s-midi-editor
best-settings-for-reaper-7
practice-your-timing-with-midi-rhythm-trainer-for-reaper
why-reaper-is-not-saving-your-project-settings
how-to-stop-reaper-from-looping-items
split-midi-items-using-mouse-wheel-in-reaper
mind-blowing-midi-note-generator-in-reaper-midi-ex-machina
drum-racks-in-reaper
advanced-fx-browsing-in-reaper
reaper-7
global-scale-tool-in-reaper-let-it-key
5-useful-scale-tools-in-reaper
4-ways-to-get-minimal-in-reaper
how-to-recreate-a-guitar-noise-gate-plugin-in-reaper
best-free-plugins-for-reaper-tukan-studios
how-to-separate-tracks-in-the-mixer
how-to-tweak-any-reaper-theme
js-lava-reverb-amazing-free-shimmer-reverb
how-i-record-guitars-quick-and-easy-in-reaper
5-tips-for-getting-started-in-reaper
create-save-and-load-layouts-in-reaper
customize-the-look-of-your-midi-notes-in-reaper
copy-and-replace-midi-note-sections-in-reaper
quick-way-to-go-through-takes-in-reaper
pan-tracks-using-track-name
amazing-free-denoiser-in-reaper
easy-seamless-loop-using-second-pass-render-in-reaper
reverse-midi-trick-in-reaper
a-guide-to-automation-items-in-reaper
a-trick-to-expand-and-collapse-toolbars-in-reaper
10-automation-shortcuts-in-reaper
how-to-auto-color-in-reaper
quick-way-to-check-your-levels
select-item-without-cursor-moving
how-to-stack-regions-in-reaper
5-ways-to-display-audio-in-reaper
identify-scales
js-nostalgizer
reaper-fix-files
how-to-export-backup-reaper
how-to-merge-midi-in-reaper
layer-sounds-in-one-track-in-reaper
easy-way-to-navigate-big-projects
how-to-install-multiple-reapers
how-to-strum-midi-notes
10-tips-for-writing-midi-drums-in-reaper
how-to-add-borders-to-toolbar-icons-in-reaper-6
easiest-way-to-update-reaper
show-fx-list-inside-tracks-in-reaper
smoother-waveforms-and-meters-in-reaper
how-to-copy-and-paste-velocities-in-reaper-b
quickly-test-different-tempos-in-reaper
allow-drag-import-to-insert-new-tracks
duplicate-tracks-with-no-items
js-droplets
how-to-add-gradients-in-reaper
reaper-v6-72-tons-of-new-track-group-features
how-to-clean-your-fx-list-in-reaper-8
retrospective-midi-recording
6-ways-to-lower-cpu-load-in-reaper
6-metronome-tips-in-reaper
a-trick-to-quickly-loop-items-in-reaper
how-to-reorder-midi-notes-in-reaper
how-to-fully-collapse-folders
easy-audio-stutter-in-reaper
easy-clean-up-project-folders
open-project-folder-in-one-click
change-grid-size-with-your-mouse-wheel
reaper-v6-71
quickest-way-to-pan-tracks
how-to-set-midi-velocity-shortcuts
create-shortcuts-to-your-plugins
5-advanced-ways-to-edit-in-reaper
how-to-show-plugin-ui-inside-your-tracks
how-to-show-vu-meters-on-tracks
6-things-i-wish-i-knew-when-i-started-using-reaper
how-to-stretch-midi-notes
how-to-duplicate-tracks-without-items
a-tool-for-customizing-reaper-6-theme
using-the-master-playback-rate-to-set-tempo
js-ravager-the-extreme-upward-compressor
quick-trick-to-a-b-your-tracks-and-effects
quickest-way-to-detect-midi-chords
quickest-way-to-sidechain-in-reaper
capture-anything-in-reaper-with-global-sampler
how-to-rename-midi-notes
quickest-way-to-create-midi-items
5-ways-to-adjust-crossfades-in-reaper
get-useful-buttons-on-top-of-your-items
how-to-get-rid-of-recording-prompt
quickest-way-to-check-your-mix-in-mono
show-track-panel-on-the-right-side
easily-create-stems-with-stem-manager

Best MIDI Settings for REAPER’s MIDI Editor

If you often work with several MIDIs simultaneously, these settings are super useful. Huge thanks to SeventhSam for this amazing MIDI workflow guide which inspired this tip!

These settings lets you quickly switch between MIDI items, visualize and even edit and write on them all at once.

Apply the settings:

  1. Go to Preferences > Editing Behavior > MIDI Editor
  2. Apply the following settings:

Simply put, these settings let you open an item in the MIDI editor just by clicking on it. It's most effective when you have the MIDI editor docked at the bottom.

Before we proceed, we need to adjust one more thing.

  1. Open the MIDI Editor.
  2. If the Editor is docked, right-click just above the piano keys to bring up the MIDI Editor Menu. If the Editor is undocked, the menu can be found at the top of the window.
  3. Go to Options > CC events in multiple media items and ensure Draw and edit on all tracks is checked, like so:

Turning this setting on allows us to draw and change CC lane data across several tracks when we can edit secondary items.

The workflow

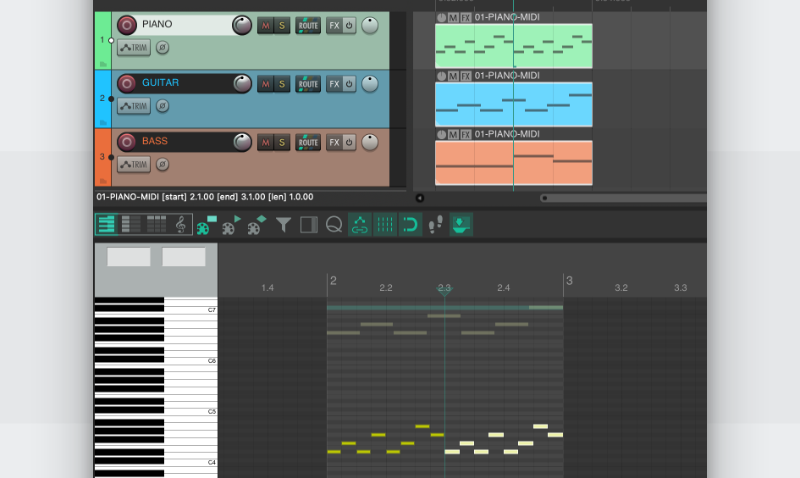
Once you have enabled these settings, I suggest you dock the MIDI editor to the bottom. This way you can view both the arrange view and MIDI editor at the same time.

To dock the MIDI editor, just double click any MIDI item to open the MIDI editor, and right click above the piano keys and select “Dock window”.

If for any reason, it doesnʼt dock to the bottom, hereʼs a video on how docking works and how to save and recall these layouts.

With your MIDI editor docked, you can now:

  • Click on any MIDI item in your arrange view to quickly switch to it.
  • Select multiple MIDI items to see them all in the MIDI editor at once.

Switching active take

When you select multiple MIDI items, the first you select will be the active item. The others become secondary items.

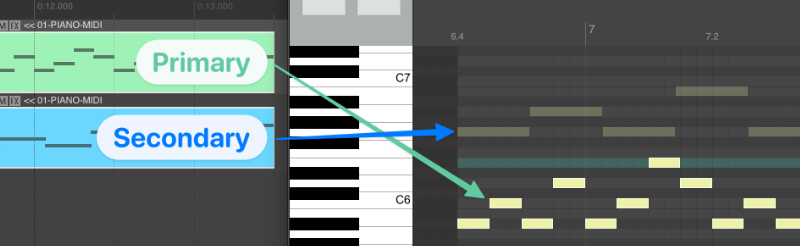
In other words, active items are editable and fully visible, while secondary items are transparent and not editable.

But what if you wanted to maintain your selection and just change the active item?

There are two shortcuts we can use for this.

In the Actions menu (shortcut “?”), map shortcuts to these two actions (or place them in your MIDI toolbar):

  • Activate previous visible MIDI item
  • Activate next visible MIDI item

Using these actions you should be able to quickly switch the current active item from the items you have selected.

Toggling multi-track note editing

Now that we are able to quickly switch between active items. Sometimes, you may want all items you select to become active and edit them all at once.

This is possible with one handy toggle action that we can place in our MIDI toolbar:

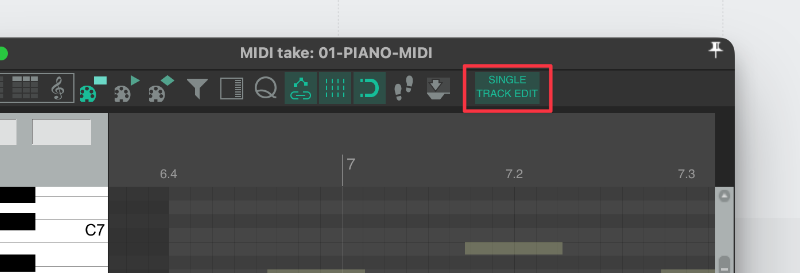
  • Find the “Options: Avoid automatically setting MIDI items from other tracks editable” action in the MIDI Editor Action List.

Assign that action to a toolbar button, a keyboard shortcut, or both.

I suggest setting it in your toolbar since you get a nice visual of when “single-track” editing is enabled or not.

How do I close my midi editor now?

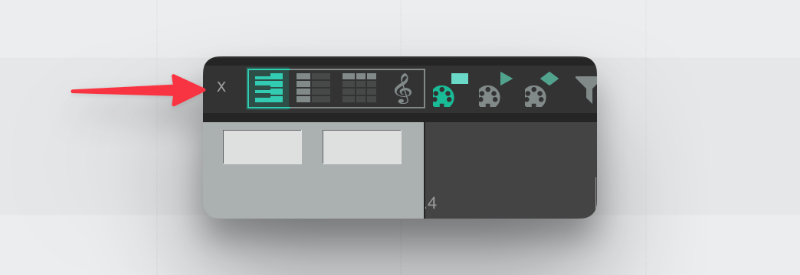
To close the MIDI editor when is docked at the bottom, I like to set the action “View: Toggle show MIDI editor windows” to my toolbar.

I set it with a text icon that says “X” and I placed it on the far-left side of my MIDI toolbar.

  1. Right click on your MIDI toolbar and select “Customize toolbar…”.
  2. Click on “Add…” and search for the action “View: Toggle show MIDI editor windows” and select it.
  3. Once it’s added to the list, you can click and drag it to place it in any order you want. I like to have this as the first icon on the far left, so I will place it at the very top.
  4. Click on “Icon… > Text icon…” and type “X”. This way your icon will look like an exit icon.
  5. Hit “OK” and now you can use this icon to close the MIDI editor.

That’s it!

Once again, thank you again SeventhSam for these MIDI settings have improved my MIDI workflow a lot ✨

Hai there!

I'm Alejandro, and I created this ad-free page to give you the best experience learning REAPER.

If you find my work helpful, please consider buying me a coffee. That'd help me cover the costs of this site and gives me more time to create free resources.

Buy me a coffee ♥
Buy me a coffee
View comments